KEY POINTS FOR THE PLANTATION AND CARE OF WALNUT SAPLINGS
1- First work shall be the preparation of the land before performing plantation. For this purpose, holes must be bored for minimum 1 meter x 1 meter size. This size may be extended up to 1,5 meter x 1,5 meter. If the size of the hole gets larger, it will contribute to the growth of sapling. Since the root development will progress faster and stronger in softened soil. However, if you have sandy and loose formed soil, it is necessary for hole to be very large. A hole in the width and depth approximately of 60 cm – 80 cm shall be sufficient. Holes must be bored with earth digger. In case of using borer, soil shall be solidified and this will negatively affect the root growth (This will also cause major problems in clayed-soil). In case of using borer, solidified side layers must be softened by using hoe. Root penetration shall be simplified by doing so. If possible, holes must be bored and refilled in prior. This may allow prevention of earth settlement after planting the saplings. If settlement occurs after planting the saplings, sapling root neck may also be buried as well. This will cause decay on the root or root neck.
2- Forming the sapling rows in the direction of dominant wind shall be beneficial while establishing the garden. Thus, you will allow well air circulation and take precautions for certain diseases.
3- Filled hole is reopened in the depth of 60 – 70 cm before plantation. It is recommended to place 2-3 leonardite and 200 gr DAP fertilizer mixture on the bottom of the hole. You may also place these fertilizers when you first bored the hole. It is necessary to cover the fertilizer mixture with a layer of soil in the height of 5-10 cm. Then, you may plant the saplings. If you place the top soil of the land around the roots during sapling plantation, soil will be more beneficial. After the saplings are planted, if you place 2-3 kg leonardite around the sapling, saplings will be fed better from the rain.
Note: You may use burnt animal fertilizer instead of leonardite. However, if such fertilizer contains pesticide, it will be very harmful for the sapling. It is recommended to use burnt animal fertilizer around the tree when the saplings are well grown. However, it is required for fertilizer to be burnt well.
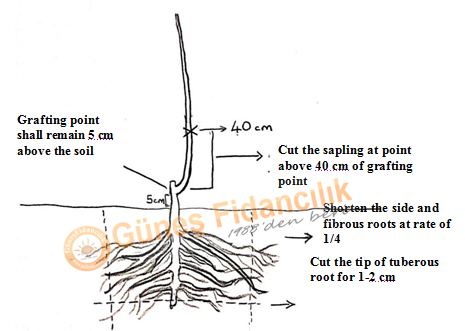
4- Prune the roots as indicated above before the plantation. Clean the scarred parts if any during pruning and remove the overlapping roots. Do not prune much. Shorten the tip of tuberous roots for 1-2 cm and long side roots for a small rate (such as ¼) to facilitate formation of new roots.
5- It is advised to dip the roots into anti-fungal medicine before plantation.
6- Spread the side and fibrous roots well in the hole during plantation. Do not allow bending of roots.

7- Deep plantation is the most common mistake for sapling plantation. Grafting points of saplings must be over the ground level for minimum 5 cm. Grating points must remain under the soil. For this purpose, ensure that the soil is pressed enough to prevent post-settlement.
8- Ensure that no pit around the sapling is formed. Otherwise, rainwater in winter may accumulate around the sapling and cause root or root neck diseases.
9- Press the soil around the sapling after plantation to prevent air penetration to the roots.
10- Tie the saplings to stakes-poles for protection against wind. Stakes must be driven in the direction of the wind. Their height must be around 2,5 meters. 2 meters stakes shall be sufficient since 40-50 cm of the stakes will remain under the soil. If they are short, they will be insufficient when the saplings are grown. Stakes driven prevent root movement when the wind shakes the saplings and allow straight growing of new twigs that will emerge in summer.
11- Pour sap in the amount of 10-20 litres after plantation. Sap suppresses the soil and prevents air penetration to roots.
12- Shorten the sapling height latest on 15th March every year in a way to keep only 30-40 cm above the grafting point. In this way, roots feed the twigs and provide faster growth. Then, only the best and most developed twig must be left and other twigs developed in June must be cut.
13- Tie the saplings to stakes by using 8 knots. Tie them on 2 locations not one by using 8 knots.
14- Paint the sapling by using white plastic paint after plantation. Painting performed will protect the saplings from cold in winter and hot in summer.
15- Plastic roll nets may be dressed on the body after plantation. These nets will protect the saplings from pests, harmful insects, cold and frost.
16- Loosen the soil hardened around the sapling by using hoe when the winter is over (maybe in March). You may mix 200 gr root fertilizer (such as DAP or 15-15-15) while loosening the soil by using hoe.
17- CAUTION!!! In spring season, firstly the wild eyes under the graft come up. The twigs coming out from these eyes must be cut immediately, when they are seen. Otherwise, grafting eyes shall come up very difficultly. These twigs must be checked regularly, because you will see that they emerge for several times, even you think that you have cut them. If you do not cut them, the energy coming from the roots are pulled by these wild twigs. As a result, the twigs within the grafted part cannot come up or the twigs may remain too small.

18- In the irrigation period (depending on the precipitation, approximately it is commenced in the middle or at the end of May approximately), water regularly and well-balanced. If your soil is beach sand – which is water-permeable- then irrigate in average every 5-7 days; if your soil is black clayed soil retaining water, then irrigate in average every 7-10 days. These rates may change depending on the weather conditions and structure of the soil. Do not water midday heat.
19- Please carry out the required fertilization application in spring and summer seasons, based on the results of the soil analysis, according to the needs of the soil. The roots of walnut may go down deep up to 3 meters. Therefore, it is necessary to take samples up to 150-180 cm depth in order to make analysis. Besides, you may also have the leaves analysed in the development period of the trees.
20- DISEASE!!! Walnut anthracnose is the primary disease of walnut. The disease agent is an airborne fungus. It may be seen as the brown – black colour spots on the entire green parts of the walnut (leaves, leafstalk, young twigs, and fruits). The disease may cause fall of leaves and fruits. Even, the tree may defoliate entirely before the autumn comes, and may quiescent.
Cultural Measures to be taken in Struggling with Disease: The diseased fallen leaves must be collected, and destroyed by burning, a good air circulation must be ensured with the planting form of the trees and pruning.
Chemical Struggle is very important. We recommend the medication named “Maneb 80 WP” (300 gr per 100 litres). Time of use of this and similar medications is very important. Please carry out at least 3 applications.
1. Disinfection: In the period, which the anthesis starts, and the leaflets are in a size of cat’s ear.
2. Disinfection: In the period, buds proliferate and leaflets grow in the half-size.
3. Disinfection: In the periods, the fruits reach to a size of hazelnut.
4. Disinfection: As long as the infection condition continue, considering the effect of the medication in rainy regions. Thus, in summer period continuing with rain and moist. However, three applications are sufficient in many regions.
21- DISEASE!!! Walnut Bacterial Blight

As most of the today’s nurseries are established with the imported species (such as Chandler, Fernor, Fernette, Franquete, etc…), which bloom late, this disease is not seen very often. It is rather seen in the local species, which bloom early.
The initial indications of the disease are seen in male and female flowers. The diseased flowers darken and dry completely. The disease spreads to the leaves, twigs, and fruits from the flowers with the rain drops. Numerous spots, formations in line forms cause malformation and deformations on the leaves. Sometimes the ends of the twigs die. The spots may be superficial on the twigs, as well as they may reach to the core. It creates black and mildly sunk spots on the fruits. In time, these spots become widespread and rot the fruits. The colour of the walnut changes, and taste goes bitter. It may cause significant fall of the fruits.
Cultural Measures to be taken in Struggling with Disease: – when the bigger branches are cut, the pruning points must be covered with grafting wax or water-stop.
-The diseases fruits, which has fallen in the early period, must be collected and destroyed.
-Over-nitrogenous fertilizers must be avoided.
-Pruning must be carried out so as to ensure air circulation.
-If disease is present, then the pruning equipment must be disinfected by immersing into bleach, while passing from one tree to another.
Chemical Struggle: -Cuprous compounds are used for disinfection, when the disease is seen.
In addition, the Bordeaux slurry poured in February (at a rate of 1%) and in December (at a rate of 2%) after the defoliation is one of the cheapest and beneficial measures to be taken against the bacterial blight and some fungal diseases. Besides, the Bordeaux slurry contributes in late-blooming of the trees, and also in protection against the early frosts of spring.
22- Sun-Burn: Sun-burn generally emerges as a result of exposure of fruits to direct sunlight in the ripening period, caused by incorrect pruning. Quality and yield losses occur due to sun-burns. A correct pruning is required, which provides air flow, in order to prevent this. Furthermore, Kaolin Clay must be used in regions, which are very hot in summers. This clay is applied on the entire surface of the tree, mixing it water, via spraying. The action time of the clay is 15 days. Its effect disappears after the rain, it has to be applied again.
23 – CAUTION!!! Generally chemical struggle is not required in the nurseries, which correct cultural measures are taken, in walnut cultivation.
24 – The most important pest seen in walnut is Codling Moth. In the first stage, it cause the fruits fall down, in the next stage it destroys the market value of the fruit, as the moths are nourished with the walnut. Struggling: The fruits, which fall down under the tree in summer, must be collected and destroyed. Establishing the walnut nurseries away from the pome fruits, such as apple, pear, and quince, will be useful. There are many natural enemies of this month. Random use of medications must be avoided in order to protect these useful enemies. However, if they are more than 3%, then pesticide must be used. Pesticides from INSECTICIDE group are used for this. The first application is carried out when the fruits are in size of hazelnut. If there is not any increase, then another application is not made. But if the damage continues, then the disinfection is continued according to the action time of the pesticide.
25 – Key Points in Fertilization:
– A deficiency may be seen in sandy soils in terms of nutrients. Organic substance amount and the deficient nutrients must be met with the additional fertilization.
– The nitrogen amount must be increased, when the organic substance amount decreases. The nitrogen amount must be decreased, when the organic substance amount increases.
– Phosphor and nitrogenous fertilization amounts must be increased, when the yield amount increases.
– It will be useful to take samples from the depths of 0-30 cm, 30-60 cm, 60-90 cm, 90-120 cm,120-150cm, and 150-200 cm for soil analysis.
– Nitrogen is needed primarily in blooming and fruit set periods.
– Soil analysis allows us to determine the amounts of elements existing in the soil. The leaf analysis is used in the assessments regarding the fruit quality and fruitfulness. The leaf analysis must be made at the end of June – in the middle of July. With the leaf analysis, a good assessment for the status of nutrition is made.
– Animal manure may also be top-dressed on the land, in order to increase the organic substance amount. 4 tones, in average- per decare may be top-dressed, as the amount. However, the nitrogen ratio in animal manure is very less, when compared with the chemicals. Furthermore, animal manure may also have some toxic impacts. The animal manure is given in spring in case of sandy soils, and in autumn in case of clayed soils. It must be given to the surface in case of sandy soils, and to the deep in case of clayed soils. Use of Leonardite will be very useful, in order to increase the organic substance amount.
– NITROGEN accelerates the development of the leaf and stem. When it is lacking, the leaves located on the lowest parts of the plants go yellow; the development of small leaves and weak branches degrades. It cannot be met by soil, it must be provided by means of fertilizer. It very efficient in the growth of the tree. If the nitrogen is less than 2% in the leaves of the walnut, then nitrogen deficiency will be the case. Nitrogen-containing fertilizers: Urea (It has the highest nitrogen rate), Ammonium Nitrate, and Sugar Fertilizer (Ammonium Sulphate) may be used. 7-8 times of nitrogenous fertilizer application may be carried out in sandy soils during the development period. The application is commenced at the beginning of spring.
– PHOSPHOR plays an important role in root growth and development. In case it is lacking, the colour of the leaves turns into puce or dark blue, and the development of the root degrades.
– POTASSIUM plays role in blooming and fruit development. In case it is lacking, then the edges of the leaves turn into brown. The resistance against diseases decreases. The flowers become rather pale and fruits become smaller, and the yield decreases.
26 – GENERAL FERTILIZATION PROGRAMME
In the Middle or At the End of March: DAP (18.46.0). 200 gr per tree must be applied, mixing it with soil. One application is made. Note: In March, if the soil is not mud, the first weeding must be carried out at the bottom of the trees. Ventilation by weeding the bottom of the saplings during summer is important for the first years.
May, the 4th Week: Humic Acid (100 millilitre per tree)
June, the 1st Week: Ammonium Sulphate (Sugar Fertilizer) 50 gr per tree
June 2nd Week: Humic Acid (100 millilitre per tree) + MAP (12.61.0) 50 gr per tree.
June 3rd Week: 20.20.20 (50 gr per tree)
June 4th Week: Humic Acid (100 millilitre per tree) + Ferrum (25 gr per tree) + Zink (25 gr per tree)
July 1st Week: URE 50 gr per tree.
July 2nd Week: Humic Acid (100 millilitre per tree) + Magnesium Sulphate (25 gr per tree)
July 3rd Week: 20.20.20 (50 gr per tree)
July 4th Week: Humic Acid (100 millilitre per tree)
August 1st Week: 20.20.20 (50 gr per tree)
August 2nd Week: Potassium Sulphate (50 gr per tree)
NOTE: This programme is a general fertilization programme. Changes may be made with the soil analyses and leaf analyses that you will have. Please use these fertilizers by increasing their amounts 2 times every year, in the first 3 or 4 years.
27 – PRUNING
1st Year: The saplings are pruned so as to 40 cm remains above the grafting point on the 15th of March, and water-stop is applied on the point of cut. The twigs coming out below the grafting point must be checked during summer, and cut immediately, when they are seen. In June, the strongest branch among those above the grafting, which grows up vertically, is selected, and the others are cut.
2nd Year: The saplings will be above 2 meters, depending on the care. They must be cut approximately from 240 cm, at the latest on 15th of March, in cold regions. In June, all twigs must be cut, so that there will not be any branches up to 160 cm from soil. At 160 cm and above 160 cm, one branch must be left in every 20 cm. the left branches must not be in the
same direction on over the other strictly. The branches facing different directions must be left.
In addition, one leader must be left at the top. The branches other than those must be cut.
3rd Year: In March, rapid development is encouraged cutting 1/3 of the length of the existing branches and 2/3 of the length of the leader. In June, again one branch is left 20 cm above the leader, and the competitive branches are cut, if any.
4th Year: Again, growth is encouraged cutting from the ends of the branches. It is deemed that the form of the tree is now created.
Note: If there are deficiencies also in the 5th Year, then malformation pruning may be carried out again. However, in the following years excessive pruning is not carried on, only minor yield pruning may be carried out. The aim of the yield pruning is to increase the energy of the tree, cutting the branches, which overlap or are dead, affecting the fruitfulness.